AUDIO A10-TX-US Digital Transmitter User Manual The A10 Digital Wireless System meets the stringent requirements of the professional audio community involved in
AUDIO Digital Transmitter A10-TX-US User Manual
The A10 digital wireless system meets the stringent requirements of the professional audio community in the film and TV production industry. It offers superior audio and RF performance.
The A10's digital RF transmission allows the user to control up to 20 channels on an 8 MHz television channel, maximizing spectrum efficiency without sacrificing range, audio quality or latency.
A10-TX-US is the US only version of the transmitter. It incorporates Audio Ltd's proprietary digital modulation scheme while maintaining the high sound quality that Audio Ltd has become known for, and with an extremely low end-to-end latency of 2ms.
The A10-TX-US has an intuitive menu system that allows the user to familiarize themselves with the settings within minutes of being turned on.
The A10-TX transmitter offers a universal audio input for receiving two-wire lavalier microphones, balanced microphones (with selectable 12V or 48V phantom power), and balanced line level signals. It includes a built-in digital recorder with an accurate time code generator (recording with lavalier microphones is not available on US market transmitters). The internal microSD card in the transmitter stores audio data in a proprietary MIC format. The free Mic-to-WAV utility for Mac OS and Windows converts MIC files into a standard broadcast WAV file with timecode.
Key Benefits
- Low-noise, balanced, studio-grade mic and line-level input with analog limiter and phantom power.
- All digital RF transmission
- Built-in digital recorder with precision time code generator (for mic/line level operations)
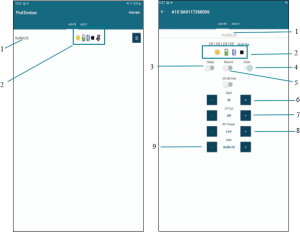
- Bluetooth® remote control with the A10-TX-US Remote app for Android and iOS.
- Runs on regular AA batteries.
A10-TX-US User Manual
Quick system start
The A10 digital wireless system is easy to use. Follow the steps below for basic setup and operation.
At the recipient
- Attach the supplied straight and rectangular antennas to the A10-RX receiver.
- Connect the receiver to a power source. It will turn on immediately.
- Using the scan tool in the "Select" menu, find an available open frequency. If several
wireless systems are used, make sure to separate frequencies of at least 400 kHz. - Connect the audio output of channel 1, channel 2, or both to the audio input on the mixer,
recording device, camera or speakerphone. - Make sure the type and level of the receiver's audio output is set depending on the type of login.
On transmitter
- Attach the direct antenna to A10-TX-US.
- Connect the sound source to the 3-pin LEMO input connector.
- Insert AA batteries into the A10-TX-US battery compartment and turn on the device with a red on / off button.
- Install the audio input type that applies to the connected input.
- Set the transmission frequency to A10-TX-US in accordance with the frequency installed on A10-RX
Receiver channel. - Adjust the amplification of the sound according to the environment and the source, trying not to overload the signal. This is evidenced by the Red LED.
At the recipient
- Make sure that the blue channel power indicator is constantly lit blue.
- Make sure that the RF state indicators and the display show the good RF power on both antennas.
- Make sure that the sound level on the receiver matches the sound connected to A10-
TX-US Login. - Now the system is ready to use.
A10-TX-US User Guide
Connectors, controls Description
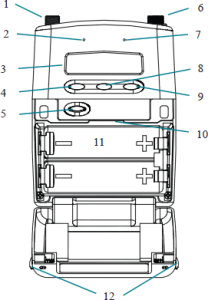
- – Nest of antennas SMA connector, 50 Ohms, connects to the accompanying 1/4-wave pin antenna.
- – Power LED The blue LED is on when the device is turned on. Flashing when the device is in sleep mode. LED can be turned off in the menu.
- – Display OLED screen. The screen automatically turns off while working to save battery charge.
- – Left button Moves the selection in the left menu or reduces the values. When the "Sound Disconnection Button" option is turned on, press and hold to disable / enable sound.
- – Power button Press to turn on the device. Press and hold to turn off the device. Press and hold while holding the right button to block / unlock the device.
- – Audio input Connector Balanced LEMO-3 connector. Accepts several types of audio inputs, including an asymmetrical paste, symmetrical microphone, symmetrical linear. Also used to enter and output temporary code.
- – Input overload LED Red LED lights up when the input signal is 3 dB before clipping.
- – Menu button Log in to select the menu. Also used to select parameters in the menu.
- – Right button Moves the menu selection to the right, opens the recording status screen or increases the values.
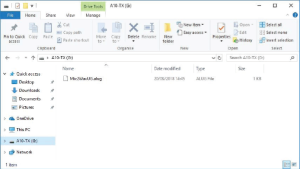
- – MicroSD card slot The card slot is used to record Files and download firmware updates to the device.
- – Battery compartment Accommodates two AA LR6 batteries.
- – Battery compartment Latch Click on both latches to open the battery cover.
A10-TX-US User Guide
Turning on the power
- Open the battery compartment by simultaneously pressing both mechanical retainers. (See Figure 1.)
- Insert two Fresh AA (LR6) batteries. Pay attention to the correct polarity of the battery.
- For a moment, press the red on / off button. A blue power indicator lights up, and the display will light up.The transmitter is now on.
- To turn off the transmitter, press and hold the red button until the "shutdown" progress bar completes and the device turns off.
Main display
- RF output power – three power levels are indicated: low (10 mW), medium (20 mW), high (50 mW)
- Input Gain – The gain applied to the input source, in dB.
- Battery status – shows battery level tag Transmitter battery level, five segments
- Frequency in MHz – the transmission frequency is displayed.
- Frequency per channel Sub-channel – the transmission frequency is displayed in region, channel and sub-channel.
- Input level meter – indicates the level of the input audio signal.
- Recording "dot" indicator – flashes in the upper left corner during recording. The write feature is not available for Lavalier operations. See Recording for more information.
Press the left button to view the name of the transmitter. The transmitter serial number is the default transmitter name. The transmitter name can be changed in the A10-TX-US Remote app.
On the main screen of the transmitter, pressing the right button displays information about the recording status, such as file name (when recording), file duration, remaining recording time, time code values, and frame rate. Record status information is not available for Lavalier operations.
Menu control and menu selection
The A10-TX-US transmitter is controlled through its menu. Enter the menu with the center menu button. When in a menu, the Left and Right buttons toggle options, and the Menu button makes a selection.
The menu lock feature on the A10-TX allows you to lock the buttons. Press and hold the power button while holding the right button to lock/unlock access to menu settings. When menu access is locked, the lock icon appears on the main display (shown at right).
In the locked state, the power button remains active.
Main menu
Choice
Icon
Description
Available Options
Return to the main display screen.
- TV channel increment
- Subchannel Increment
- Frequency increase in 25 kHz steps
- Lavalier: 0dB to +40dB
- Line setting: -10 to 16 dB
- Microphone setting: 16 to 40 dB with 20 dB pad
- Microphone setting: 36 to 60 dB
- LF
- limiter
- Love / Microphone / Line
- Mute button
- Recording
- File Info
- TX / recording mode
- Time code
- Frame frequency
✦ Time code and frame rate are the only options available for Lavalier operations.
Activates transmission privacy with a four-digit key installed on the transmitter and receiver. When it is active, the receiver must be set to the appropriate key in order for the sound to pass through.
- New key – generates a new key
- Off – encryption cleared, set —, not active.
- Bluetooth
- RF Power
- brightness
- Battery Type
- Blue LED
- TV channel map
- Sleep mode
- Lock Menu
- LAV / MIC / LINE parameter is set to Line or Mic LEVEL. They are not available for operations with Lavalier.
- Menu Settings
- Choice
- Icon
- Description
Available options
Return to the main menu.
ON.
- from
- Low – 10 MW
- MED – 20 MW
- High – 50 MW
- Alkaline
- Nimh.
- Lithium
- User information
– use
- – Download new
- Production
- Map of TV channels
- X – 6 MHz
- Y – 7 MHz
Z – 8 MHz
- brightness
- Blue LED
orientation
Display submenu
Choice
Icon
Description
Available options
Return to the main menu.
- Sets the brightness of the OLED screen
- Five steps, 1-5, 5 brightest
- ON.
- from
orientation
- Normal (default)
- Flipped.
![]()
System menu
Choice
- Icon
- Description
- Available options
Return to the main menu.
![]()
Sleeping
- 23.98
- 24
- 25
- 29.97
- Sleeping
- 30
- Block the menu
Unlock
Castle
Set time / date
Sets the time and date of the clock of real time.
Deletes all Files and data available on the MicroSD card inserted.
OK – the formatting process begins.
Reestablish
- The recovery function allows the user to reset the A10-TX to the default factory settings.
- Serial number
![]()
- Firmware version
- Frequency range
- Update (firmware)
![]()
- Updates the transmitter firmware using the .prg File firmware on the microSD card.
- Main operation
- Frequency selection
- The A10 digital wireless system operates in the UHF frequency range from 470 to 608 MHz. There are two models of the A10-TX-US transmitter to cover this frequency range.
Several digital wireless systems A10 can be used simultaneously at adjacent adjacent frequencies, without worrying about intermodulation interference, since the A10 digital wireless system and its digital radio frequency transmission is inheress in its naturalness to the intermodulation." lang="en" style="height: 28px;">Set time / date
Map format - Reestablish
Info
- Updating Built-in Software
- A10-TX-US User Guide
- Sound setup menu
- Return to the main menu.
- from
- 40 Hz
60 Hz
80 Hz
100 Hz
200 Hz
ON.
from
![]()
Love / microphone / line
Lav
- A little
- line
P48 – Microphone level with phantom 48 V
- P12 – microphone level with phantom 12 V
- Sound off button
Incl. – Turning off the transmitter sound can be turned on or off by holding the "Left" or "Right" button for 1 second.
Off – The label is disabled.
Record / TC menu
Choice
Icon
Description
Available options
- Return to the main menu.
Select "Record" to enter the recording mode (recording begins). The status of the record is remembered during sleep and nutrition cycles.
- Time is up; Expired
- Time left
Temporary code
File name and surname
TX / recording mode *
TX / REC – simultaneous wireless transmission and recording
Reconly – only recording function
Enter the temporary code menu.
- The temporary code values are displayed or from the connected external temporary code generator, or from the internal generator.
- Times of Day
- External
JAM – applies an external time code to an internal generator.
✦ To join the external time code source, AC-TCBNC-IN or AC-TCLEMO accessories are required.
Frame frequency
29.97 XNUMX XNUMX XNUMX DF
30 XNUMX XNUMX XNUMX DF
These parameters are available only if the AUDIO Setup> LAV / MIC / LINE parameter is set to Line or Mic LEVEL. They are not available for operations with Lavalier.
Menu Settings
Choice
- Icon
- Description
Available options - Return to the main menu.
ON.
 from
from
Low – 10 MW
MED – 20 MW
High – 50 MW
Alkaline
Nimh.
Lithium
User information
– use
– Download new
- Production
- Map of TV channels
- X – 6 MHz
- Y – 7 MHz
Z – 8 MHz
brightness
Blue LED
orientation
Display submenu
Choice
Icon
Description
- Available options
- Return to the main menu.
Sets the brightness of the OLED screen
Five steps, 1-5, 5 brightest
ON.
from
orientation
Normal (default)
Flipped.
System menu
Choice
Icon
- Description
- Available options
Return to the main menu. - Sleeping
Sleeping
Block the menu
Unlock
Castle
Set time / date
Sets the time and date of the clock of real time.
Deletes all Files and data available on the MicroSD card inserted.
- OK – the formatting process begins.
- Reestablish
- The recovery function allows the user to reset the A10-TX to the default factory settings.
- Serial number
- Firmware version
- Frequency range
- Update (firmware)
- Updates the transmitter firmware using the .prg File firmware on the microSD card.
- Main operation
Frequency selection
The A10 digital wireless system operates in the UHF frequency range from 470 to 608 MHz. There are two models of the A10-TX-US transmitter to cover this frequency range.
![]()
- Several digital wireless systems A10 can be used simultaneously at adjacent adjacent frequencies, without worrying about intermodulation interference, since the A10 digital wireless system and its digital radio frequency transmission is inheress in its naturalness to the intermodulation.Lav / Mic / Line is set to Line or Mic level. They are not available for Lavalier transactions.
- Settings menu
Choice - Icon
- Description
- Available Options
- Return to the main menu.
- On
- from
Low – 10 mW
Med – 20 mW
High – 50 mW
Alkaline
NiMH
Lithium
User information
- – use
- – Upload new
Production
TV channel map - X – 6 MHz
- Y – 7 MHz
Z – 8 MHz - brightness
- Blue LED
orientation - Display submenu
Choice
Icon
- Description
- Available Options
- Return to the main menu.
Sets the brightness of the OLED screen
- Five steps, 1–5, 5 is the brightest
- On
from
- orientation
- Normal (default)
flipped
System menu
Choice
- Icon
- Description
- Available Options
Return to the main menu.
Sleep mode - Sleep mode" lang="en" style="height: 28px;">Set time/date
- Card Format
- Reestablish
Info
Firmware update
A10-TX-US User Manual
- Sound settings menu
- Return to the main menu.
- from
40 Hz
60 Hz
80 Hz
100 Hz
200 Hz
On
- from
Love / Microphone / Line - lav
- A little
- line
P48 – mic level with 48V phantom - P12 – mic level with 12V phantom
- Mute button
On – Transmitter mute can be turned on or off by holding the Left or Right button for 1 second.
Off – the label is disabled.
Recording menu / TC
- Choice
- Icon
- Description
- Available Options
Return to the main menu.
Select "Record" to enter recording mode (recording starts). Recording status is remembered during sleep and power cycles.
Time is up; elapsed time
Time left
Time code
File Name and surname
TX / recording mode *
TX/Rec – Simultaneous wireless transmission and recording
RecOnly – recording function only
Enter the time code menu.
The time code values either from the connected external time code generator or from the internal time code generator are displayed.
Times of Day
External
Jam – Applies an external timecode to an internal generator.
✦ Muting to an external time code source requires the AC-TCBNC-IN or AC-TCLEMO accessories.
Frame frequency
29.97 DF
30 XNUMX XNUMX DF
These options are available only when Audio Setup > Lav / Mic / Line is set to Line or Mic level. They are not available for Lavalier transactions.